前言
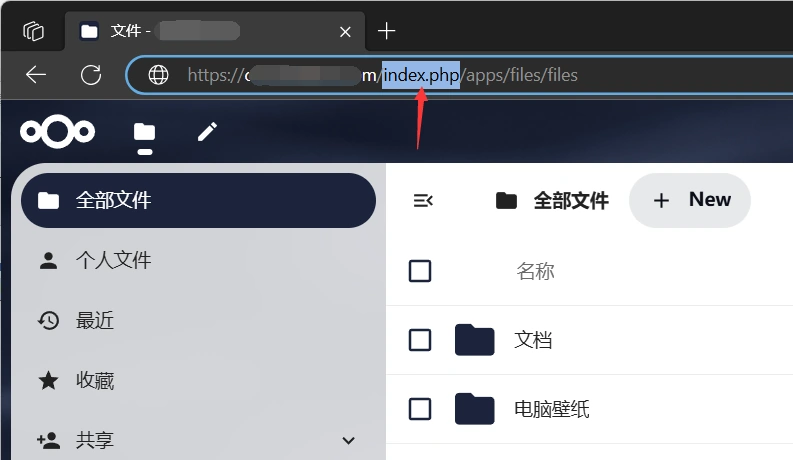
搭建Nextcloud云同步项目,项目域名URL中有“index.php”字符,影响URL的美观,从用户体验的角度来看,一个简洁、没有多余字符的URL会显得更专业、更直观。
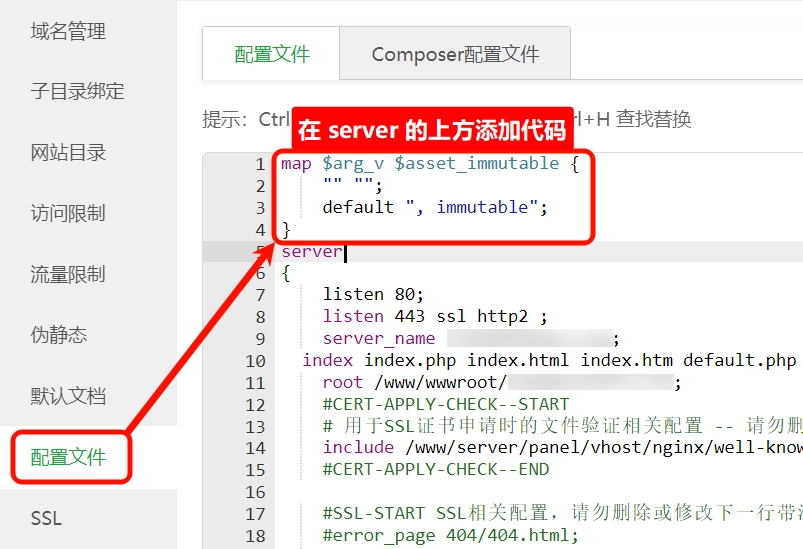
一. 在宝塔面板打开Nextcloud的网站设置,按照下图的步骤,在配置文件中的server的上方添加以下代码。
map $arg_v $asset_immutable {
    "" "";
    default ", immutable";
}
二. 往下翻找到#SSL-END,在其下方粘贴以下代码。
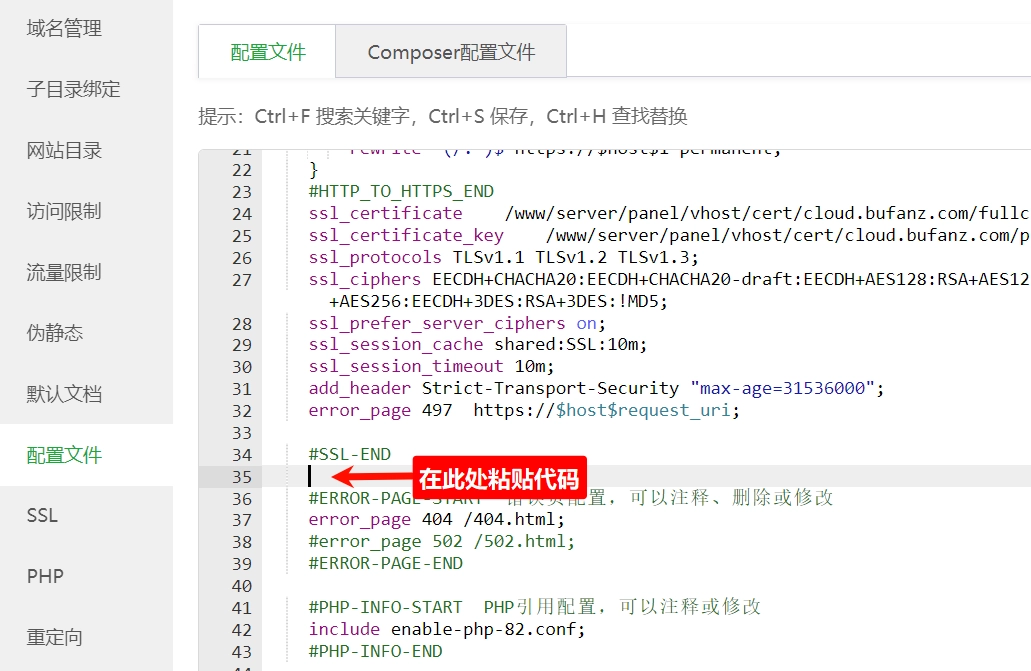
# HTTP response headers borrowed from Nextcloud `.htaccess`
add_header Referrer-Policy "no-referrer" always;
add_header X-Content-Type-Options "nosniff" always;
add_header X-Frame-Options "SAMEORIGIN" always;
add_header X-Permitted-Cross-Domain-Policies "none" always;
add_header X-Robots-Tag "noindex, nofollow" always;
add_header X-XSS-Protection "1; mode=block" always;
# Remove X-Powered-By, which is an information leak
fastcgi_hide_header X-Powered-By;
index index.php index.html /index.php$request_uri;
# Rule borrowed from `.htaccess` to handle Microsoft DAV clients
location = / {
if ( $http_user_agent ~ ^DavClnt ) {
return 302 /remote.php/webdav/$is_args$args;
}
}
location = /robots.txt {
allow all;
log_not_found off;
access_log off;
}
# Make a regex exception for `/.well-known` so that clients can still
# access it despite the existence of the regex rule
# `location ~ /(\.|autotest|...)` which would otherwise handle requests
# for `/.well-known`.
location ^~ /.well-known {
# The rules in this block are an adaptation of the rules
# in `.htaccess` that concern `/.well-known`.
location = /.well-known/carddav { return 301 /remote.php/dav/; }
location = /.well-known/caldav { return 301 /remote.php/dav/; }
location /.well-known/acme-challenge { try_files $uri $uri/ =404; }
location /.well-known/pki-validation { try_files $uri $uri/ =404; }
# Let Nextcloud's API for `/.well-known` URIs handle all other
# requests by passing them to the front-end controller.
return 301 /index.php$request_uri;
}
# Rules borrowed from `.htaccess` to hide certain paths from clients
location ~ ^/(?:build|tests|config|lib|3rdparty|templates|data)(?:$|/) { return 404; }
location ~ ^/(?:\.|autotest|occ|issue|indie|db_|console) { return 404; }
location ~ \.php(?:$|/) {
rewrite ^/(?!index|remote|public|cron|core\/ajax\/update|status|ocs\/v[12]|updater\/.+|ocs-provider\/.+|.+\/richdocumentscode(_arm64)?\/proxy) /index.php$request_uri;
fastcgi_split_path_info ^(.+?\.php)(/.*)$;
set $path_info $fastcgi_path_info;
try_files $fastcgi_script_name =404;
include fastcgi_params;
fastcgi_param SCRIPT_FILENAME $document_root$fastcgi_script_name;
fastcgi_param PATH_INFO $path_info;
fastcgi_param HTTPS on;
fastcgi_param modHeadersAvailable true; # Avoid sending the security headers twice
fastcgi_param front_controller_active true;
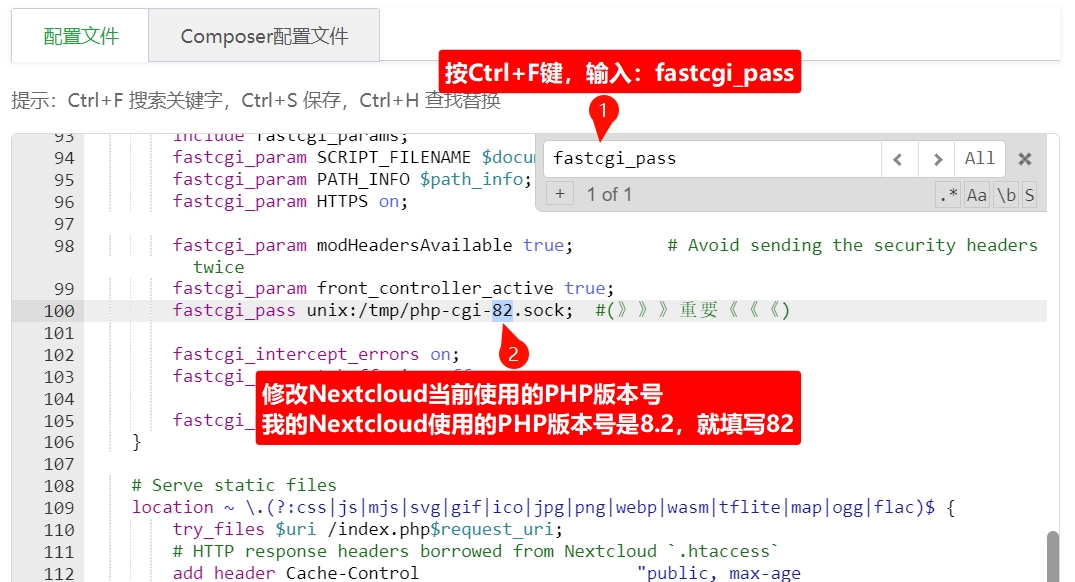
fastcgi_pass unix:/tmp/php-cgi-82.sock; #(》》》重要《《《)
fastcgi_intercept_errors on;
fastcgi_request_buffering off;
fastcgi_max_temp_file_size 0;
}
# Serve static files
location ~ \.(?:css|js|mjs|svg|gif|ico|jpg|png|webp|wasm|tflite|map|ogg|flac)$ {
try_files $uri /index.php$request_uri;
# HTTP response headers borrowed from Nextcloud `.htaccess`
add_header Cache-Control "public, max-age=15778463$asset_immutable";
add_header Referrer-Policy "no-referrer" always;
add_header X-Content-Type-Options "nosniff" always;
add_header X-Frame-Options "SAMEORIGIN" always;
add_header X-Permitted-Cross-Domain-Policies "none" always;
add_header X-Robots-Tag "noindex, nofollow" always;
add_header X-XSS-Protection "1; mode=block" always;
access_log off; # Optional: Don't log access to assets
}
location ~ \.(otf|woff2?)$ {
try_files $uri /index.php$request_uri;
expires 7d; # Cache-Control policy borrowed from `.htaccess`
access_log off; # Optional: Don't log access to assets
}
# Rule borrowed from `.htaccess`
location /remote {
return 301 /remote.php$request_uri;
}
location / {
try_files $uri $uri/ /index.php$request_uri;
}
三. 粘贴后,按Ctrl + F键,搜索fastcgi_pass,修改Nextcloud当前使用的PHP版本号,修改完成后保存配置文件。
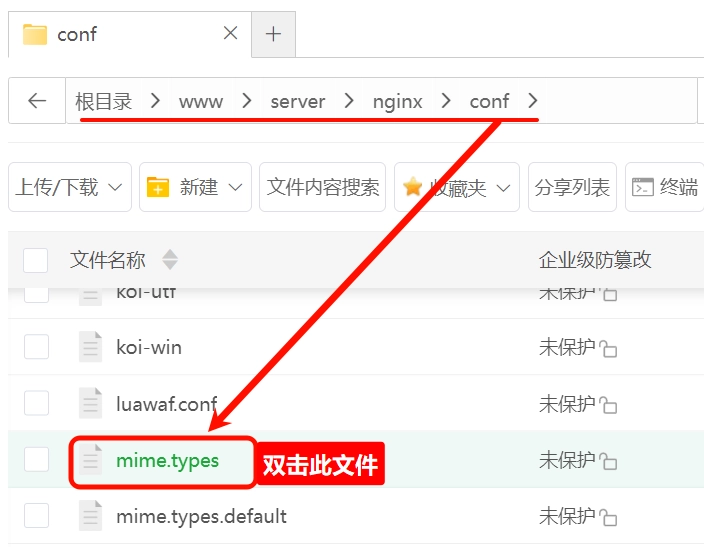
四. 按照下图的步骤,在文件管理找到/www/server/nginx/conf目录,双击打开mime.types文件。
添加以下代码并保存文件。
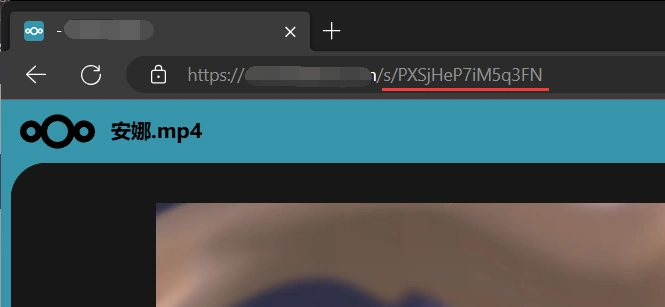
application/javascript mjs;打开Nextcloud的域名或分享链接,URL中已经没有index.php字符。